A well designed API needs a well-designed frontend to allow the user to use the API well. To do this, I had to utilise functions that had the user in mind. This included things such as Angular, Angular Material, and the Google Icon Library.
Router
Firstly, we needed to allow users to navigate through the pages. This was done through the use of angular's routers. Angular is a component-based framework. This means that each page is its own component. To allow for navigation and appropriate displaying of the correct component, we have to code the correct paths in. This is done like so:
export const routes: Routes = [
    {
        path: '',
        component: DashboardComponent  // DASHBOARD COMPONENT
    },
    {
        path: 'custom-prompt',
        component: CustomPromptComponent
    },
    {
        path: 'flashcards',
        component: FlashcardsComponent
    },
    {
        path: 'question-answer',
        component: QuestionAnswerComponent
    },
    {
        path: 'summariser',
        component: SummariserComponent
    },
    {
        path: 'login',
        component: LoginComponent
    },
    {
        path: 'sign-up',
        component: SignUpComponent
    },
    {
        path: 'student-profile',
        component: ViewStudentProfileComponent
    },
    {
        path: 'add-section',
        component: AddSectionComponent
    }
];
Where each path is the URL path. So the FlashcardComponent could be found at the URL https://studdybuddy.app/flashcards
This also allows for navigation within the code. For example, if a user is not logged in, the code automatically navigates them to the login page with the code:
this.router.navigate(['/login']);
Interceptors
When something is not correct, for example if a user is not logged in or there is an error returned by the backend, the code has to intercept it to ensure that the frontend does not display these errors and allow them to correct the mistake without confusing them.
Cookie
Firstly, we have the cookie interceptor component. The code is:
import { Injectable, inject } from '@angular/core';
import {
  HttpRequest,
  HttpHandler,
  HttpEvent,
  HttpInterceptor
} from '@angular/common/http';
import { Observable } from 'rxjs';
import { PLATFORM_ID } from '@angular/core';
import { isPlatformBrowser } from '@angular/common';

@Injectable()
export class CookieInterceptor implements HttpInterceptor {
  private platformId = inject(PLATFORM_ID);

  intercept(request: HttpRequest<unknown>, next: HttpHandler): Observable<HttpEvent<unknown>> {
    let token: string | undefined;

    if (isPlatformBrowser(this.platformId)) {
      token = document.cookie.split("; ")
        .find((row) => row.startsWith("token="))
        ?.split("=")[1];
    }

    const modifiedRequest = request.clone({
      withCredentials: true,
      setHeaders: token ? { 'token': token } : {}
    });

    return next.handle(modifiedRequest);
  }
}
This code extracts a token from the user's browser storage and automatically adds it to every request that is sent. This ensure that the user is authenticated to prevent injection to the Gemini API.
Error
If the backend returns an error, particularly a 401 error indicating that a user is not logged in (from an invalid cookie), the frontend intercepts it to prevent the app from stopping or halting. The code is:
import { Injectable } from '@angular/core';
import {
    HttpRequest,
    HttpHandler,
    HttpEvent,
    HttpInterceptor,
    HttpErrorResponse
} from '@angular/common/http';
import { Observable } from 'rxjs';
import { Router , ActivatedRoute, NavigationEnd} from '@angular/router';
import {tap, filter} from 'rxjs/operators';
@Injectable()
export class ErrorInterceptor implements HttpInterceptor {

    constructor(private router: Router, private route: ActivatedRoute) {}
    getChildRoute(route: ActivatedRoute): ActivatedRoute {
        while (route.firstChild) {
            route = route.firstChild;
        }
        return route;
        }
    intercept(request: HttpRequest<any>, next: HttpHandler): Observable<HttpEvent<any>> {

        const modifiedRequest = request.clone({
            headers: request.headers.set('X-Requested-With', 'XMLHttpRequest'),
            withCredentials: true
        });


        return next.handle(modifiedRequest).pipe( tap(() => {}, (err: any) => {

            if (err instanceof  HttpErrorResponse) {

                if (err.status != 401 ) {

                    return;
                }

                this.router.navigate(['/login']);
            }
        }));
    }
}
Here, the code intercepts all incoming requests. If the response has a code of 401, it automatically redirects to the login page and discards the contents of the request. This prevents an error from reaching the user and causing the app to halt.
Snackbars
Some of these requests take time before the AI can respond. To let the user know, I used Angular-Material's snackbars to prevent the user from leaving the page prematurely due to a request taking time. For example, below is the snackbar that appears when a user requests to create flashcards.

This is the snackbar that appears when the user tries to create flashcards, ensuring that the user is not confused by wait times.
Additionally, the snackbar can also be used to display errors. For example, if the user does not have an existing account and tries to login, the app returns a separate snackbar, as shown below:
 This indicates to the user that they need to sign in.
Flashcards
When the flashcards are requested, we use a custom-built component that was taken from a StackBlitz repository to display them. This can be seen below:
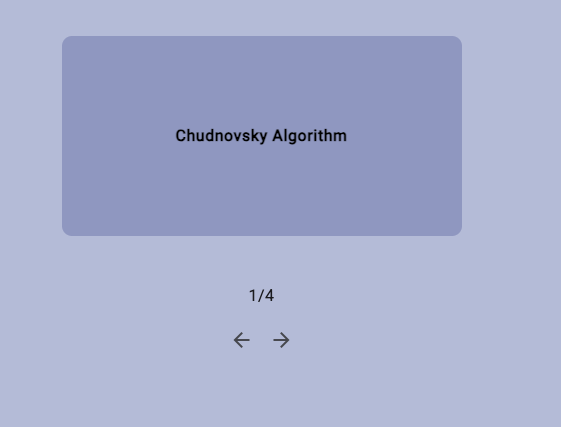 This creates a friendly environment for the user to interact with their flashcards. There is a display of the flashcard they are currently looking at and there is buttons to flip between the various flashcards. Additionally, the user can just click the flashcard to view its behind side.
Animations
When flipping between the sides of the flashcards, there is an animations which can be seen below:
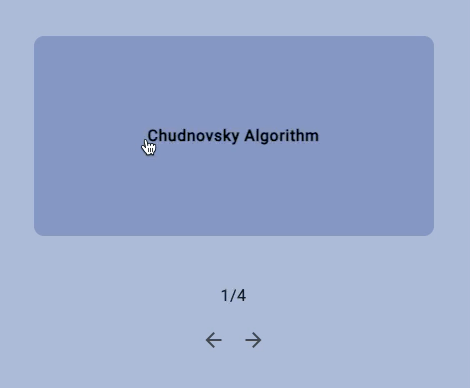
This brings a better user experience as it adds fluidity to the app. The code to do this is the following:
  animations: [
        trigger('flipState', [ // Triggered when the user clicks the flashcards
          state('active', style({
            transform: 'rotateY(179deg)'
          })),
          state('inactive', style({
            transform: 'rotateY(0)'
          })),
          transition('active => inactive', animate('500ms ease-out')),
          transition('inactive => active', animate('500ms ease-in'))
        ])
      ]
HTTP Requests
Every single component makes an HTTP request. We do this with the general format of the GET/POST Request as shown in the code below:
// For a POST Request
this.http.post(this.URL + "API_REQUEST", DATA).subscribe((res: any) => {

})

// For a GET Request
this.http.get(this.URL + "/API_REQUEST").subscribe((res: any) => {

})
Angular Material
I wanted the app to look good. To do this, I used premade components from a proprietary npm module called Angular Material. From here, I have taken various components such as:
- The NavBar

- The Side Tree
- The aforementioned snack bar
And many more
This creates fluidity and cleanliness in the app and also adds a dynamic layer as these components are scaleable to the size of their display, creating a better user experience
Icons
I used the google Icon library to simplify the purpose of some buttons into images rather than words to reduce the page's clutter. They have been used in various places such as:
- The menu Row

- Each node on the side bar